はじめに
こんにちは たそ(@taso_int)です。
久しぶりです。
今日はEE(execution environment)を作成し、AAP上で
実行環境として登録する方法について書きたいと思います。
EEとは
本題ではないので、ざっくりと説明しますが、
AAP2.0以降ではコンテナ内でAnsibleが実行されます。
そのコンテナの実行環境をEEと呼ばれます。
EEイメージ → EEが作成 → PlaybookがEEで動く
AAPインストール時にデフォルトで3つEEイメージが登録されていますが、
場合によっては自前でイメージを作成する必要があリます。
よくあるケースとしては、
独自でcollectionおよびpythonパッケージを用意したい場合です。
collectionに関してはrequirements.ymlで指定することで
Playbook実行時にインストールするなどの対処も可能ですが
collectionインストールに時間がかかり結果的に
Playbookの処理に時間がかかるなどのデメリットがあります。
環境
- AWS ec2
- Red Hat Enterprise Linux release 8.6
- AAP2.2
AAPは既にある状態で行いたいと思います。
構築方法はこちらへ
AAPのライセンスに関しては
Red HatさんのRed Hat Developer Programに参加し、
Developer Subscriptionを利用しています。
詳細はこちらへ
公式情報
https://access.redhat.com/solutions/6654601
ansible-builderのインストール
EEイメージをビルドしてくれるansible-builderを用意します。
ansible-builderにはdnfとpipの2種類があり、
それぞれEEイメージのベース元が異なります。
dnfだとregistry.redhat.io、pipだとquay.ioとなります。
今回はdnfを使いたいと思います。
rootユーザーで操作
サブスクリプション登録
subscription-manager register
Registering to: subscription.rhsm.redhat.com:443/subscription
Username: (サブスクリプションユーザー名)
Password:(パスワード)

リポジトリ有効化
subscription-manager list --available

Red Hat Ansible Automation Platformが入っているpool値をメモ

subscription-manager attach --pool=<メモしたpool値> 有効になればOK

クラウド環境の場合(リポジトリを引っ張れるように)
subscription-manager config --rhsm.manage_repos=1

ansible-builderのインストール
dnf install --repo=ansible-automation-platform-2.2-for-rhel-8-x86_64-rpms ansible-builder

バージョン確認
ansible-builder --version
1.1.0
これでansible-builderのインストールは終わりました。
EEイメージの作成
EEイメージを作成するには必要なファイルを用意する必要があります。
- execution-environment.yml イメージの設定
- requirements.yml インストールしたいcollection
- requirements.txt インストールしたいpythonパッケージ
- bindep.txt インストールしたいアプリケーション(gitとか)
- ansible.cfg collecitonの取得設定(補足https://docs.ansible.com/ansible/latest/galaxy/user_guide.html#downloading-a-collection-from-automation-hub)
おまけで/etc/ansible/ansible.cfgを設定したいので、
Ansibleの設定であるansible.cfgを用意します。
イメージにファイルを埋め込みたい場合はcontextディレクトリを作成し、
そこにファイルをおきます。
ディレクトリ構造が分かりづらいので補足
.
└── /opt/
    └── /builder/
        └── /smartcs/ # イメージごとにディレクトリを分けた
            ├── ansible.cfg
            ├── requirements.txt
            ├── requirements.yml
            ├── bindep.txt
            ├── execution-environment.yml
            └── /context/
                └── ansible.cfg # /etc/ansible/ansible.cfg用のファイル
今回はciscoとjunosとsmartcsのcollectionを
インストールしたいと思います。
必ずrootユーザーで行ってください(違うユーザーでやるとハマる)
各ファイル内容
execution-environment.yml
---
version: 1

ansible_config: 'ansible.cfg'

build_arg_defaults:
  EE_BASE_IMAGE: 'registry.redhat.io/ansible-automation-platform-22/ee-minimal-rhel8:latest'

dependencies:
  galaxy: requirements.yml
  python: requirements.txt
  system: bindep.txt

additional_build_steps:
  prepend:
    - COPY ansible.cfg /etc/ansible/ansible.cfg
requirements.yml
collections:
  - cisco.ios
  - junipernetworks.junos
  - seiko.smartcs
requirements.txt
paramiko
Jinja2
bindep.txtは空
ansible.cfg
[galaxy]
server_list = automation_hub

[galaxy_server.automation_hub]
url=https://console.redhat.com/api/automation-hub/
auth_url=https://sso.redhat.com/auth/realms/redhat-external/protocol/openid-connect/token
token=取得したtoken
/context/ansible.cfg
[defaults]
host_key_checking=False
duplicate_dict_key=error

[inventory]
host_pattern_mismatch=error
any_unparsed_is_failed=True
用意出来たら以下のコマンドで実行します。
podmanにてregistry.redhat.ioにログイン
podman login registry.redhat.io
Username: (サブスクリプションユーザー名)
Password:(パスワード)

イメージの作成
ansible-builder build -t smartcs_ee -v 3
イメージが出来ているか確認します。
podman images
REPOSITORY                                                               TAG         IMAGE ID      CREATED         SIZE
localhost/smartcs_ee                                                     latest      cfd020121b4a  44 seconds ago  449 MB
<none>                                                                   <none>      c4e9bac37c9e  19 hours ago    519 MB
<none>                                                                   <none>      b438ee1082ca  19 hours ago    323 MB
registry.redhat.io/ansible-automation-platform-22/ansible-builder-rhel8  latest      33140ad06359  10 days ago     313 MB
registry.redhat.io/ansible-automation-platform-21/ee-minimal-rhel8       latest      529e936c115c  2 weeks ago     299 MB
おまけで設定した/etc/ansible/ansible.cfgも確認します.
podman run -it --rm localhost/smartcs_ee bash
bash-4.4# cat /etc/a
adjtime         adjtime.rpmnew  aliases         alternatives/   ansible/
bash-4.4# cat /etc/ansible/ansible.cfg
[defaults]
host_key_checking=False
duplicate_dict_key=error

[inventory]
host_pattern_mismatch=error
any_unparsed_is_failed=True
EEイメージを置く
EEイメージは作成できましたが、
AWXユーザー内にEEイメージがないとAAPでは動きません。
AWXユーザーに読み込むためには、
イメージをどこかに保管して引っ張ってAWXユーザーに入れるか
事前にAWXユーザーの中に置いておく必要があります。
イメージを保管する場合は、コンテナレジストリーを使用する方法があります。
まずはEEイメージをAWXユーザーに置く方法を行います。
eeイメージをtarファイルとして保存
podman save -o /tmp/smartcs_ee.tar localhost/smartcs-ee:latest

tarファイルの所有の変更
chown awx:awx /tmp/smartcs_ee.tar

AWXユーザーに切り替え
su - awx

tarファイルを解凍しイメージを作成
podman load -i /tmp/smartcs_ee.tar

イメージの確認
podman images
REPOSITORY                                                            TAG         IMAGE ID      CREATED         SIZE
localhost/smartcs_ee                                                  latest      cfd020121b4a  11 minutes ago  449 MB
registry.redhat.io/ansible-automation-platform-22/ee-supported-rhel8  latest      5b5c0fdeca9a  4 weeks ago     1.45 GB
registry.redhat.io/ansible-automation-platform-22/ee-minimal-rhel8    latest      c2450081e5d1  4 weeks ago     286 MB
registry.redhat.io/ansible-automation-platform-22/ee-29-rhel8         latest      c39fb0c046f4  4 weeks ago     799 MB
これで置けたのであとはAAPで設定をします。
管理から実行環境をクリックし、以下のように設定します。
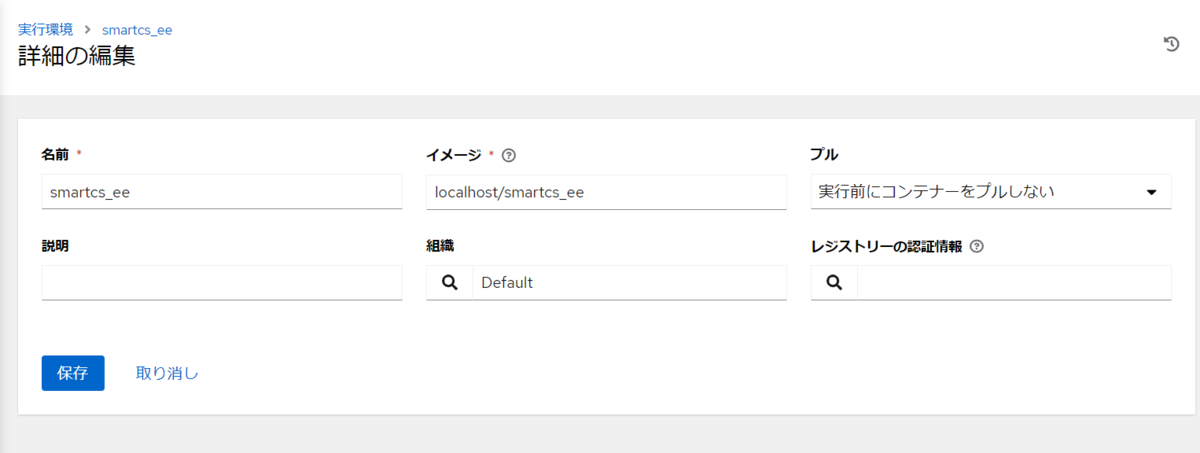
これでEEの追加が終わりました。
実行環境を設定してDemo Job Templateを動かしてみましょう
 問題ないですね。
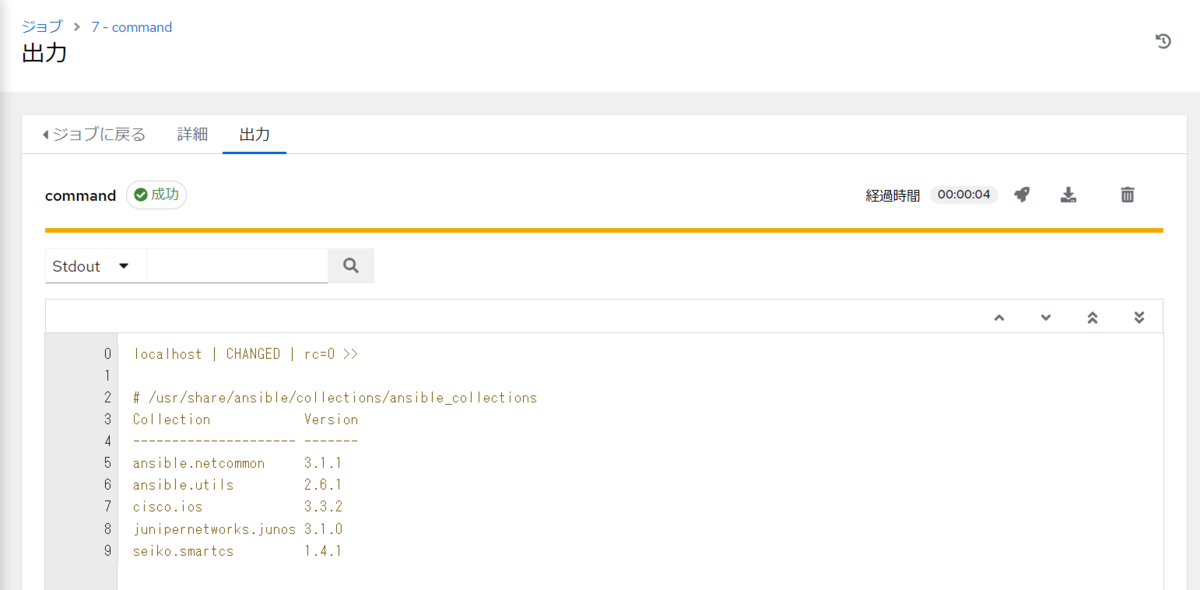
実際にcollectionが入ってるかを確認してみます。
やり方はてくなべより
https://tekunabe.hatenablog.jp/entry/2022/03/30/234632
ちゃんとcollectionが入ってますね
 以上となります。
コンテナレジストリーを使ったイメージの取得も
次回の記事で紹介出来たらなと思います。
ここまで読んでいただきありがとうございました。